A 2-Week Patagonia Itinerary: From Ushuaia to Bariloche
Disclaimer: Some links on this page may be affiliate links. If you purchase anything through them, I will receive a small commission at no extra cost to you! Further details in the Privacy Policy.
If you don’t want to miss out on some of the world’s most incredible landscapes and wildlife destinations, then this 2-week Patagonia itinerary is for you!
Two years after illness scuppered my plans to come here during my first South America backpacking trip, and I was able to spend a couple of weeks in Patagonia with my girlfriend visiting Ushuaia, El Calafate, Perito Moreno Glacier, El Chalten, Torres del Paine, Puerto Madryn, Punta Tombo, Isla Escondida and Bariloche.
We had the most magical time during 16 days in the region, although I’ve condensed this itinerary down to 14 days to take down days out of the equation, and squeeze in as many adventures as possible for your own trip.
My goal with this blog is to inspire you to see the most incredible places on earth, rather than sticking solely to well-trodden destinations such as Paris, Mallorca and Cancun which attract many tourists due to their reputations, but lack the magic of Patagonia, the mystique of Easter Island or the beauty of Myanmar.
And Patagonia certainly fits that bill as a bucket list location on the southern tip of South America.
Read on for everything you need to know whilst planning your Patagonia trip!
I would suggest planning your holiday for September-December as this covers both penguin season and whale-watching season.
What is Patagonia and Why Should You Visit?
Patagonia is a giant region covering the southern halves of Argentina and Chile at the very bottom of South America.
It is known for a variety of really cool landscapes ranging from snowy mountains, to beautiful alpine-style lakes, to rainforests, to deserts to beaches and a vast steppe, similar to where I stayed with Mongolian nomads on another cool adventure I recommend you experience!
It has some awesome wildlife, which I found to be far more interesting than anything I ever saw in Europe. Penguins, pumas and llama-like guanacos are amongst its most famous residents.
Then there are the unique experiences, including the otherworldly Perito Moreno Glacier, which I will cover later in this itinerary, and tours to Antarctica, admittedly costing a small fortune…
As I update this post, I’m close to visiting 100 countries, and not a single one of them has a region as expansive, beautiful, and fascinating as Patagonia.
How to Visit Patagonia on a Budget
As a solo traveller and budget backpacker in 2022, I gulped in horror as I sat alone in Santiago, Chile and saw how much a Patagonia adventure would cost me. Fate had already decided I wouldn’t come here, as illness struck and I was too weak to attempt any wild experiences in the weeks that followed.
Two years on and I was back in South America with my girlfriend. And whilst not cheap, the region was suddenly a lot less straining on the budget, with sharing accommodation being a big part of that. And I was fit and raring to tackle the place that eluded me in the past.
You can read a full breakdown of all spending in Patagonia later in this post.
But we found several techniques to save money in the region, and here they are:
- Use Airbnb. A hostel bed in Patagonia often costs upwards of £20/US$27 per night, making it a nightmare for solo travellers. Most of the affordable places we found were Airbnb rooms in people’s houses. We would live with the owner, but have our own room in many cases. Airbnb was often cheaper than hostels even for a solo traveller in Patagonia.
- Buddy up. If like me you love solo travel, I’m afraid Patagonia is not friendly to the budget. I would recommend using apps such as Couchsurfing, or making friends as you backpack through Argentina or Chile. Travelling with others makes a huge difference to your costs out here.
- Avoid asado. I am obsessed with ordering Argentina’s amazing steak which is amongst the cheapest in the world. But in Patagonia, it’s much more expensive. Unfortunately, fast food is best for the budget, but mix it up with milanesas and save the steak for when you leave the region.
- Book tours in person. Online tours are ALWAYS more expensive in Patagonia. This is true for everything ranging from day trips to Antarctica cruises. I recommend booking when you arrive in a place to save money. Although be aware that in peak season (December-February) tours can sell out. So you may have to take the extra financial hit if visiting Patagonia at this time of year.
- Travel by bus. Sorry budget backpackers, but you have to tolerate some discomfort to save cash out here. Rental cars are expensive and flights also cost a fair bit which leaves long-distance buses as the cheapest option. Even then, they aren’t “cheap”, but at least you can save money on accommodation with journeys that can take over 20 hours.
Now Argentina’s economy has been absolutely ravaged in recent years. This led to a black market emerging, where you could literally get double your money when I first came to Argentina in 2022 by exchanging US dollars at the unofficial rate.
Unfortunately the black market only gives you 3% extra these days. But that’s better than nothing right?
You should ask your accommodation about the nearest cueva (black market money exchange), where you can exchange money using what is known as the Blue Dollar rate.
I would recommend exchanging money in Buenos Aires, as cuevas can be hard to find in Patagonia. As a side note, you should follow this 24-hour itinerary for Argentina’s capital to see the highlights if you only stop for a layover on route to Ushuaia.
And only bring $100 dollar bills to exchange, you will get a much worse rate without these. It is also important to ensure they are in crisp condition and not damaged at all. Annoyingly, a few countries have this rule (Afghanistan is another that caused me headaches) where 5x $20 bills are worth less than 1x $100.
The other way to get good value for money is by using Western Union. They also offer good exchange rates, albeit with high transaction fees.
Paying with card offers the MEP rate, which is only marginally worse than the Blue Dollar.
Do not withdraw money from ATMs under any circumstances. You will get hammered by extortionate withdrawal fees (£7/US$10 or more) and can only take out small amounts at a time (£37/US$50).
Check out my guide to money in Argentina for further helpful information.
My Complete 2-Week Patagonia Itinerary From Personal Experience
You came here for the dream Patagonia itinerary, so here it is!
I’ve summarised how to spend your days in this helpful table below. But read the following sections for details on costs, times and what activities you can experience in this wonderful part of the world.
Patagonia has to be part of any short or long-term South America adventure.
I’ve also added several other sections on safety, Patagonia for disabled travellers, weather, the best time to visit, Argentinian vs Chilean Patagonia, and a full breakdown of our spending.
| Days | Activities | Where to Stay |
|---|---|---|
| 1-4 | Ushuaia (Tierra del Fuego National Park, Beagle Channel, Prison Museum, Martial Glacier, Esmeralda Lagoon) | Ushuaia |
| 5 | Bus to El Calafate | El Calafate |
| 6 | Perito Moreno Glacier (Day trip) | El Calafate |
| 7 | El Chalten (Day Trip) | El Calafate |
| 8 | Torres del Paine (Day Trip) | El Calafate |
| 9 | Bus to Puerto Madryn | Night bus |
| 10 | Whale watching at Playa Las Canteras | Puerto Madryn |
| 11 | Punta Tombo/Isla Escondida/Bus to Bariloche | Night bus |
| 12-14 | Bariloche (Exploring the Town and following Circuito Chico) | Bariloche |
Day 1: Ushuaia (Arrival and Prison Museum)
There’s a lot to pack into this incredible region, but after coming off your flight, I suggest easing yourself in gently.
Flying to Ushuaia
Only internal flights land at Ushuaia. This means that international flights will have at least one connection, most likely in the capital city Buenos Aires. Although São Paulo-Guarulhos is beginning flights here in July 2026.
Ushuaia Airport welcomes arrivals from Buenos Aires and Cordoba as well as several other destinations in Patagonia. Namely Rio Gallegos, El Calafate, Trelaw and Comodoro Rivadavia.
Most flights are with state airline Aerolineas Argentinas, although budget airlines JetSmart, Flybondi and LADE also fly to Ushuaia.
It’s easy to get from the airport to the city centre with Uber, which costs £3/US$4.
Ushuaia is South America’s safest city, so it’s a good place to ease yourself into Patagonia.
What to do on Day 1 in Ushuaia
After leaving the airport, head straight to your accommodation and drop your bags off. I recommend using Airbnb if you’re a budget traveller, although there are some incredible hotels such as Arakur Ushuaia Resort and Spa with its great mountain views if you have a fair bit of cash and you’re looking to travel in style.
Then it’s time to book some tours. I recommend Cumelen tours who we booked Tierra del Fuego National Park, the Beagle Channel, and a Torres del Paine day trip from El Calafate with, having a great experience each time.
It cost us £82 each (US$112) to book the Tierra del Fuego and Beagle Channel tours together with the park tour costing £39 (US$53) and the channel costing £43 (US$59). This does not include an additional £20 (US$27) that you will need to pay to enter Tierra del Fuego National Park, although it is free for disabled travellers, pensioners and young children under 6.
Once you’ve sorted everything you need for the coming days, head to the prison museum for a light start to life in Ushuaia.
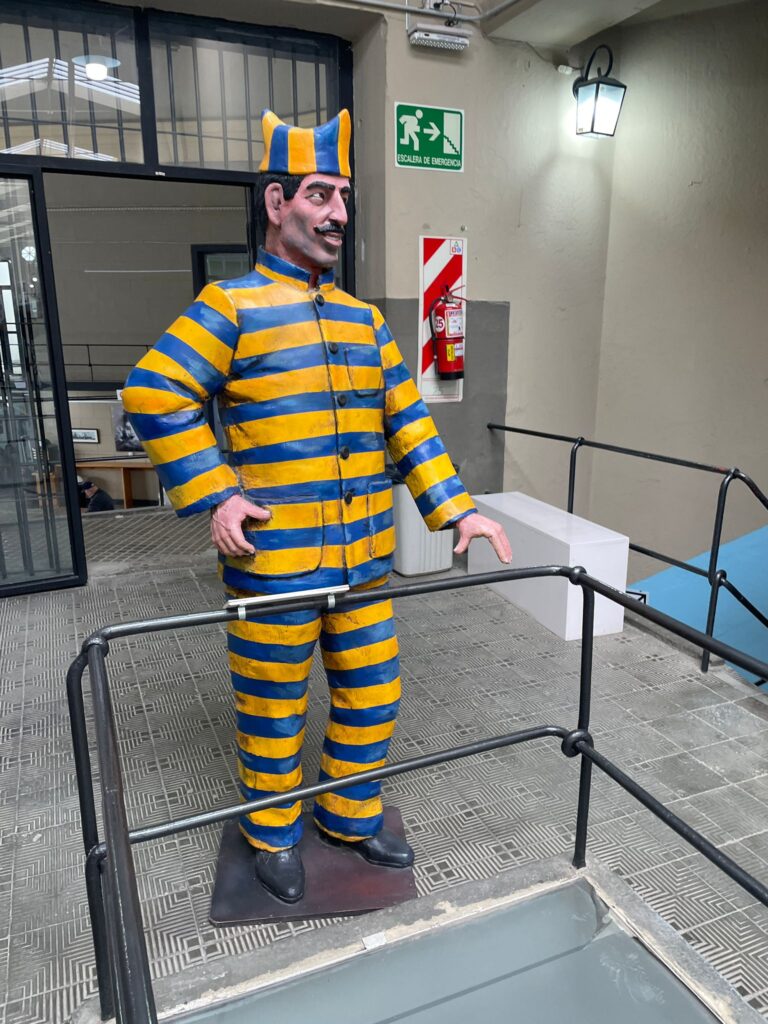
Ushuaia Prison Museum (Museo Maritimo y del Presidio de Ushuaia)
Entry Cost: £24/US$33 for adults, £17/US$23 for students under 24, £58/US$79 for a family ticket (2 adults and up to 3 under 18s), free for under 12s, anyone with a disability (you must have written proof) and residents of Tierra del Fuego
Opening Hours: 10am-8pm daily
Exploring the Museum
The museum has several different wings, each detailing a different subject. Whilst the museum is best known for its history as a prison (one subject covered), it is also a maritime museum, an art gallery, and somewhere you can learn about Antarctica.
I won’t pretend it was the highlight of our Ushuaia trip, but it’s worth an hour or two of your time nonetheless.
Ushuaia is an outdoor adventure spot, so ease yourself in gently on day one with the only indoor activity of note in the city.
Day 2: Ushuaia (Tierra del Fuego National Park, End of the World Train and Beagle Channel)
On your first full day, get stuck into the very best of what this amazing part of the world has to offer.
Tierra del Fuego National Park
Entry Cost: £20/US$27 for anyone who doesn’t qualify for free entry. Free for children under 6, pensioners, anyone with a disability, and anyone looking after a disabled person
Opening Hours: 8:30am-9pm daily
Exploring the Park
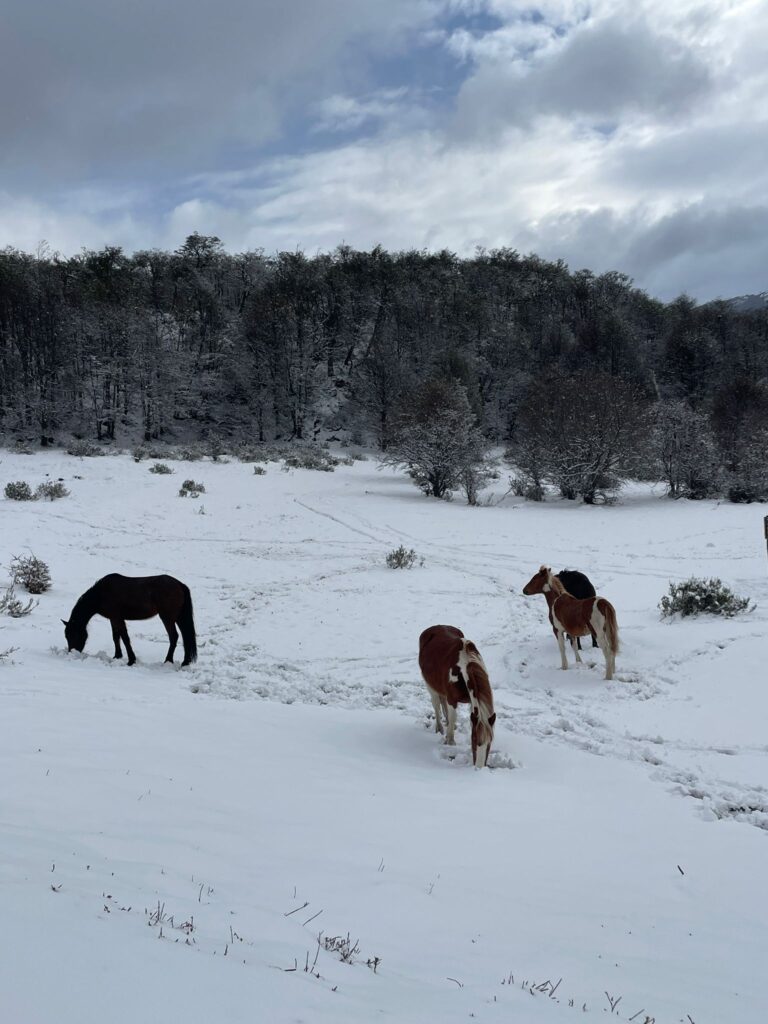
This park is beautiful and one of the best Ushuaia activities by far.
If you’re lucky enough to go when it’s snowy, just as we were, it looks just like something out of a Christmas postcard.
You can hike around various trails and spot wildlife if you’re lucky, but I recommend taking a tour if on a time limit to see the beauty of the park with a knowledgeable local guide who can explain why it’s so special and share their local knowledge with you.
The End of the World Train
Entry Cost: £40/US$54
Operating Hours: Twice a day at 9:30am and 2:30pm
The Train Ride
If you’re on a budget, skip this. It’s expensive and you get cool scenery inside the park without the train ride.
If you take it, the End of the World train will take you through the trees, lakes and mountains of this wonderful park.
Sure, it’s beautiful. But for a 1-hour train ride, the price isn’t really worth it. For context, it costs me around that price for a train ride to London from my hometown in the UK, and when I can compare train prices to the UK, that certainly isn’t a good thing!
Beagle Channel
Entry Cost: None, but boat tours start from £43/US$59
Opening Hours: Open 24/7, but boat tours run at differing times. Check with your tour operator for information on this. For reference, our tour with Cumelen left at 2:30pm and lasted around 2 hours
What the Tour Involves
Get on a catamaran and head inside where you will receive a debrief (in Spanish) of what the tour involves.
After the boat starts moving, you can come out and stand on the incredibly windy deck, watching Ushuaia shrink as you head into the distance.
There are two points of note on the tour.
Firstly, you will arrive at Puerto Karelo. This protected island is used by scientists for research purposes. You can step onto the island, but many parts are off-limits. We were only allowed on the shoreline, without being permitted to go inland.
It’s still a unique landscape however, which is fun to experience first hand. There’s also a hut with an Argentine flag which makes a cool photo backdrop.
The second point of interest is Faro Les Eclaireurs, a rocky island with a lighthouse which has been overtaken by nature.
Boats cannot stop on the island, however your tour boat will circle around several times giving you great views of the sealions that have made it their home. As a bonus, you can see some penguin-like cormorants chilling on neighbouring rocks.
Wrap up warm for this activity, the wind is relentless.
Day 3: Ushuaia (Martial Glacier)
Entry Cost: Free (But borrowing shoe spikes and a stick for hiking costs £8/US$11 and skiing starts from £30/US$41 for 1 hour)
Opening Hours: 24/7
Activities on the Glacier
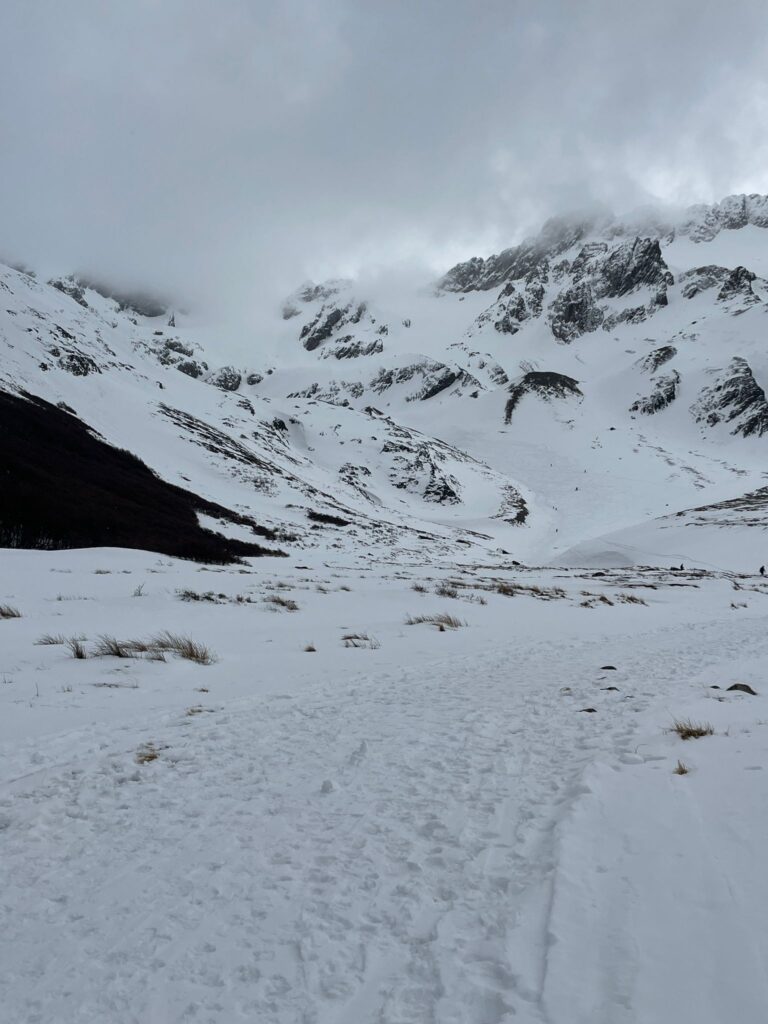
There are three things to do at Martial Glacier.
Hiking is the only year-round activity you can do. And if coming in winter time as we did, make sure you rent shoe spikes and a stick for £8/US$11.
Trust me when I say it’s far too slippery without them. Renting spikes was a very wise move during our own visit.
When the snow is on the slopes from June-October, the glacier becomes popular with skiers and snowboarders.
Go up high however and the slopes become narrow at times. They are also shared with hikers, which makes parts of the glacier risky due to reckless individuals.
My girlfriend narrowly avoided being wiped out by a snowboarder who thought it would be smart to bomb round a blind corner without looking and along a narrow stretch of the slope…
This activity is awesome and the views are great. But take care.
Day 4: Ushuaia (Esmeralda Lagoon)
Entry Cost: N/A
Opening Hours: 24/7
Visiting the Lagoon
You can get here via Uber, but you should ask your driver to wait for you, otherwise you won’t get back easily as phone signals don’t work here and there’s no wifi.
The trek takes around 4 hours in total, and is relatively easy. Your reward is a bright-green lake, which is exactly how it earned the name Esmeralda (emerald).
Do not do this activity in heavy snow however. The lake will be white and no different to what you see during the Tierra del Fuego National Park tour. You won’t see the emerald colour at all.
Ask locals in the city for information on whether the lake’s green colour is visible before going.
Day 5: Bus to El Calafate
Buses from Ushuaia to elsewhere are scarce. Once a day, you can take a Marga Taqsa bus to Rio Gallegos, a transit city to the north. Sounds simple enough right?
Wrong!
The bus leaves at 3am. A completely inconvenient time, meaning you have to either waste a night of accommodation by leaving at 2:30am, or kill time in Ushuaia with all your bags on you until the early hours.
But there are reasons for this complication. Ushuaia is located on the southern tip of Tierra del Fuego, an island. To get to the northern parts of Argentine Patagonia, you must cross a border into Chile, take a ferry across the Magellan Strait, and cross the border once more to reach Argentina again.
Fortunately Marga Taqsa take the difficulty out of this process, but it does mean your 3am bus won’t arrive until 3pm the next day. And you will need to wait a further 5 hours at Rio Gallegos to leave for El Calafate. This journey takes 4 hours meaning it’s an exhausting 21 hours to get from Ushuaia to El Calafate by bus.
We ended up in Patagonia bar until closing time at 2am, then were fortunate enough to find Canal de Beagle Hotel between the bar and the bus terminal (only a 6-minute walk apart regardless) with seating where we waited until it was almost time to board the bus.
The bus terminal doesn’t have anywhere you can sit inside. Which seems off given how cold Ushuaia can be, but it does mean that waiting at the terminal isn’t a good idea.
At Rio Gallegos, you can purchase Perito Moreno Glacier return bus tickets inside the terminal. They cost £33/US$45 rather than the £23/US$31 you would pay in El Calafate. However I recommend buying here as you will want to maximise your time in El Calafate.
When you arrive at around midnight, head straight to your accommodation and prepare for an eventful few days of adventures.
Day 6: Perito Moreno Glacier Day Trip
Entry Cost: £20/US$27 for anyone who doesn’t qualify for free entry. Free for children under 5, pensioners and anyone with a disability. An additional £40/US$54 for the optional boat ride. Return bus transport costs from £23/US$31 per person
Opening Hours: 8am-6pm (September 1st-April 30th) and 9am-4pm (May 1st-August 31st)
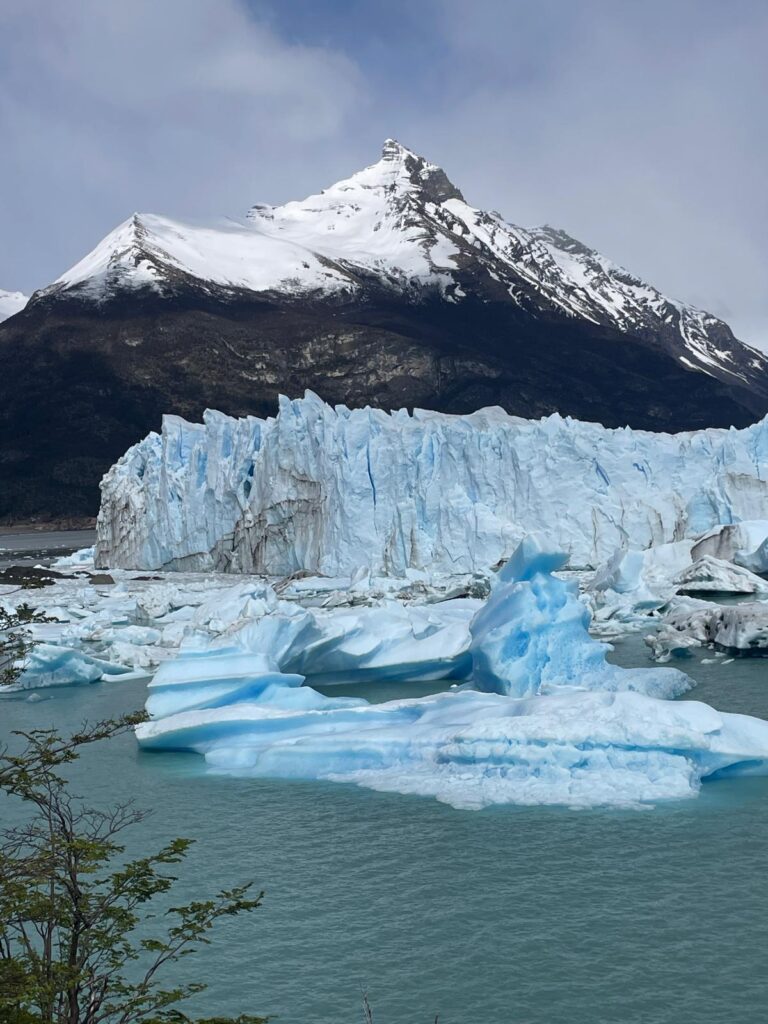
Exploring the Glacier
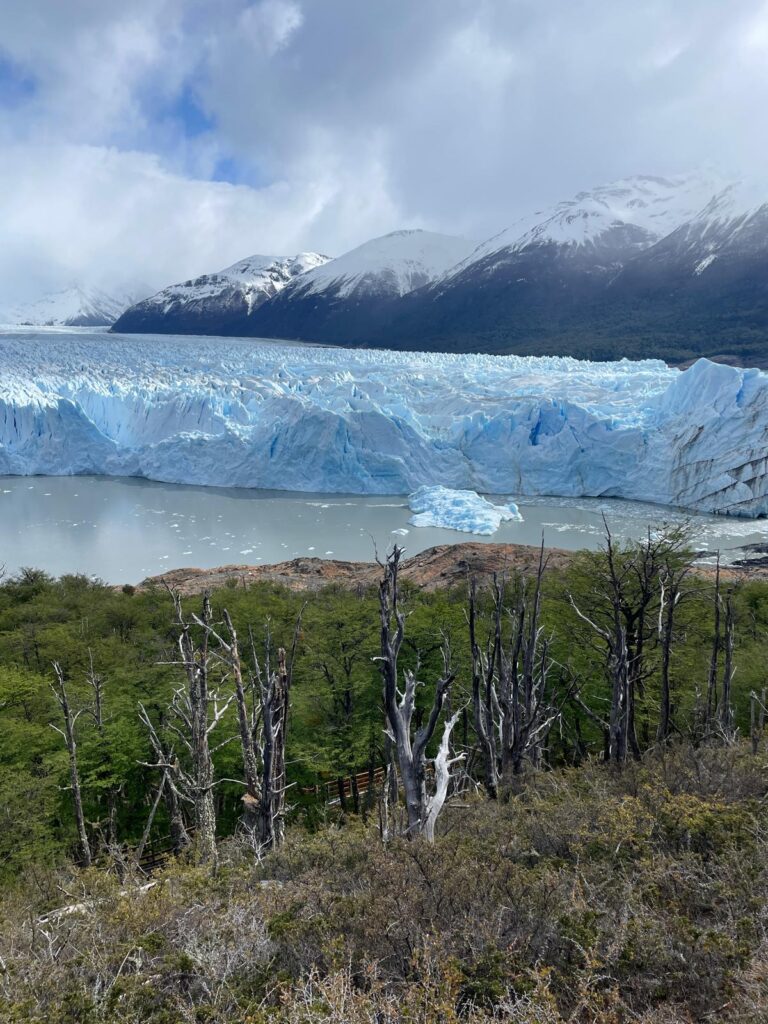
This is one of my all-time travel highlights. Perito Moreno Glacier is seriously cool, and a sight unlike anything you would have ever seen before.
There are two ways to see the glacier located in Los Glaciares National Park: by walking along the trails, or by taking an expensive boat ride to view it from the water. We chose to walk and had no regrets.
There are 5 trails. The information for each is as follows:
| Trail | Distance | Difficulty | Time | Notes |
|---|---|---|---|---|
| Inferior Trail | 1,100m | Hard | 2 hours | Mostly glacier views |
| Central Trail | 600m | Easy | 1 hour | Mostly glacier views |
| Accessible Trail | 565m | Easy | 30 minutes | Mostly glacier views and wheelchair-friendly |
| Coastal Trail | 1,117m | Medium | 2 hours | Mostly coastal views |
| Forest Trail | 570m | Medium | 1 hour | Mostly forest views |
However I’ll let you in on a little secret…
The times and difficulties for each trail are misleading.
In reality it takes around a quarter of the time mentioned above to walk each trail. I presume the times provided were taking into account stops for photos and soaking up the views. Although from real life experience I can tell you that even with long breaks, these times are 3x more than what you will actually need.
Oh, and the difficulty is overestimated too. See the difficulties in the table above, and reduce them by one for each trail so hard becomes medium, medium becomes easy, and easy becomes very easy. This will give a more realistic overview of how tricky the trails are.
If you have mobility issues, the accessible trail is step-free and suitable for anyone. People without mobility issues will be able to do each of the other trails without difficulty. We breathed slightly heavier on the Inferior Trail, but it wasn’t particularly challenging despite being labelled as “hard”. Oh, and we aren’t exactly super fit…
Don’t miss out on Perito Moreno. A bucket list experience that cannot be beaten!
Day 7: El Chalten Day Trip
Tour Cost: £69/US$94
Tour Hours: 7am-7pm
Activities on the Tour
I must admit that El Chalten was the only part of this itinerary which we didn’t love. However I included it here anyway as you may see it differently.
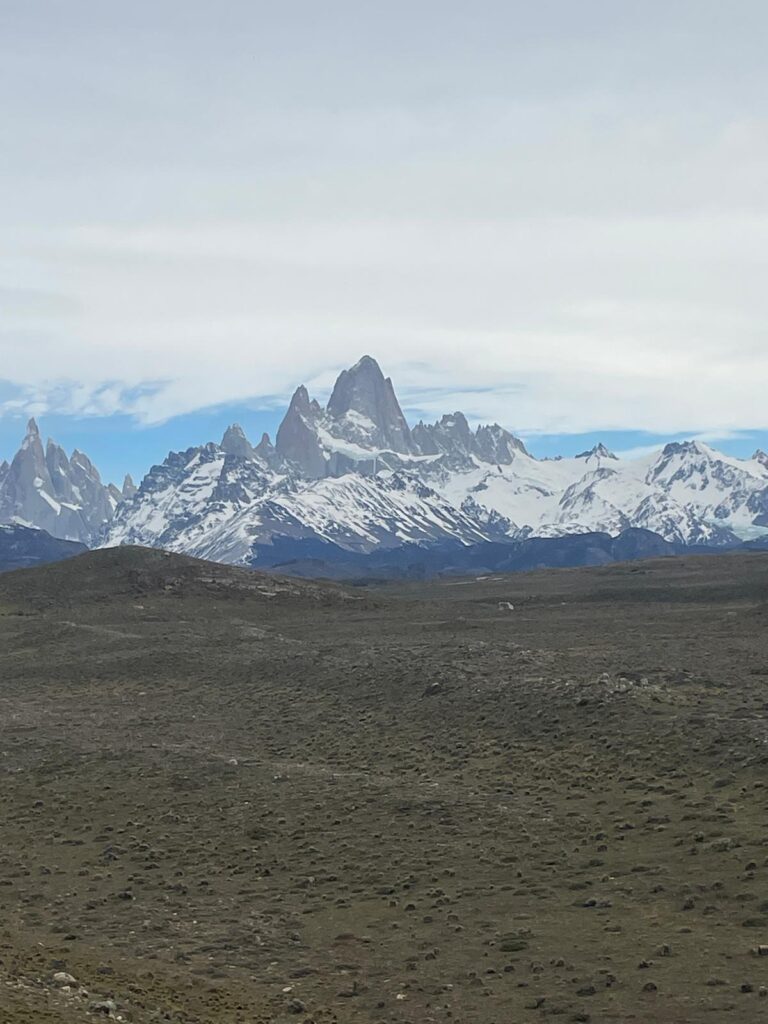
Many people love El Chalten for its hiking trails, and the famous Mount Fitz Roy. But we didn’t love El Chalten as it didn’t really feel any different to the scenery we’d experienced already in Ushuaia, which we found more impressive.
The tour took us to an area where we hiked up to Mirador de Condores, where Andean condors fly overhead.
The views from here were okay, but if you’ve already seen snowy mountains, it’s not really so impressive.
We then went to an underwhelming waterfall. Again, some people may like it. But we recently visited Iguazu Falls which made this one a damp squib really.
We also had an okay lunch (minus drinks) included in the tour, and they took us to an alfajor shop in an attempt to sell overpriced sweet treats.
But really, our personal opinion was that El Chalten was disappointing if you’ve already seen cool mountains and waterfalls. Although you may find it exciting if this isn’t the case.
I’d suggest going anyway and making up your own mind. After all, just because I didn’t love something, doesn’t mean you will feel the same way.
Day 8: Torres del Paine Day Trip
Tour Cost: £103/US$140 + a £31/US$42 entrance fee
Tour Hours: 7am-9pm
Activities on the Tour
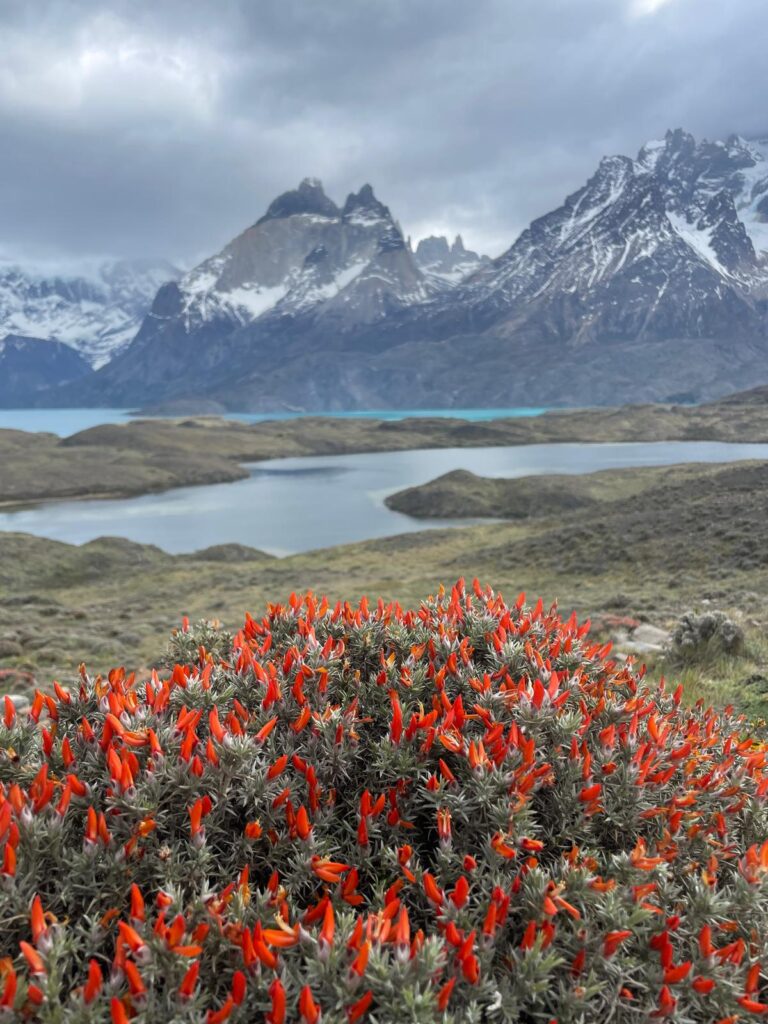
Whilst most of this itinerary focuses on Argentina, Torres del Paine is one of the highlights of Chilean Patagonia.
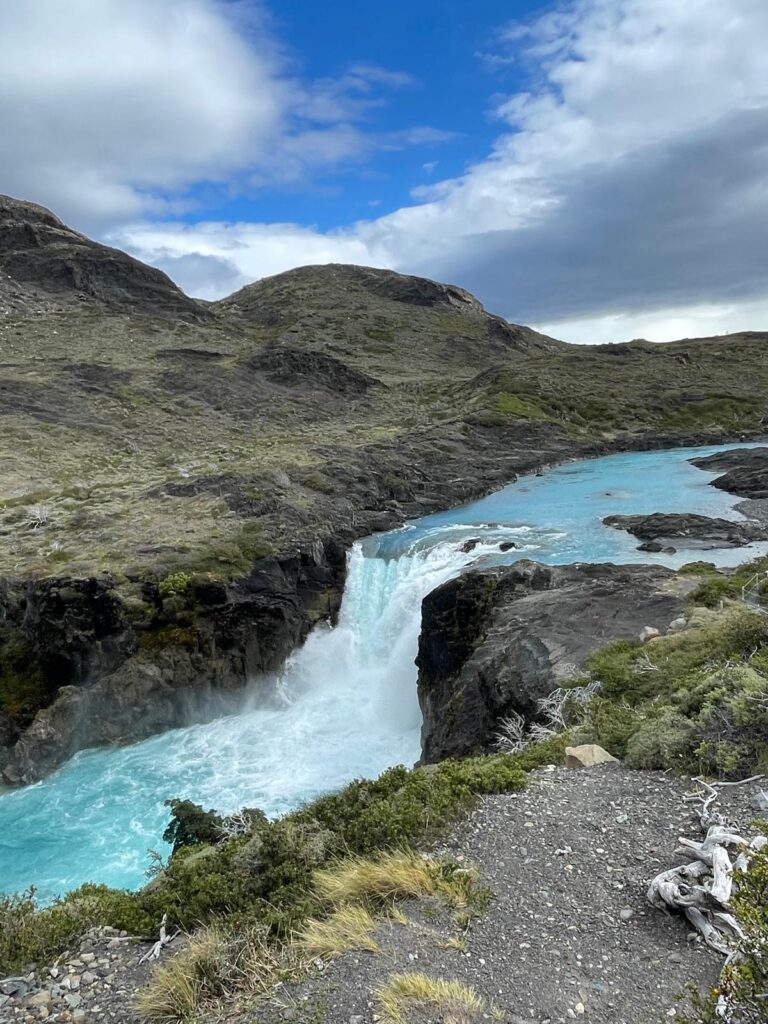
And my word, this is beautiful.
Torres del Paine is most famous for its 3 granite towers which make impressive viewing from a distance. But there’s so much more to the national park than that. The turquoise lakes are stunning, as are the waterfalls which would look like a filtered image, if you didn’t know better.
The flowers are colourful shades of red and yellow, whilst a wide range of creatures including pumas and guanacos roam around nearby.
A puma even ran past our vehicle on the way back! Although it ran so fast, it had already gone by the time our guide pointed it out.
We feared Torres del Paine may have nothing new to offer, just as we thought with El Chalten. We were wrong. This place is amazing.
Day 9: Bus to Puerto Madryn
You will need to buy bus tickets from El Calafate’s terminal. The company you want is Andesmar. The first leg of the journey is with Marga Taqsa, although Andesmar can sell the tickets on their behalf for no extra cost.
Once again, you must head to Rio Gallegos, with the bus leaving El Calafate at 11am and arriving at 3pm. After a 4-hour wait in Rio Gallegos, a punishing journey to Puerto Madryn awaits at 7pm. You will arrive at 2pm the next day making this a 27-hour journey in total.
When you eventually arrive, check into your accommodation and either rest, or go and sort out a tour to Punta Tombo for day 11. If you don’t book a tour on this day, you will have a lot of spare time to do so on the next.
We booked this tour with Sentir Patagonia. Although it was slightly cheaper (£86/US$117) to book in person.
We found the best accommodation to be an Airbnb. As Puerto Madryn is short on budget options, it is wise to book a few days in advance so places are still available.
Day 10: Whale Watching at Playa Las Canteras
Cost: £166/US$226 with an official tour. Although we paid our Airbnb host £38/US$52 to drive us both ways and wait for an hour
Time Required: 3 hours (1 to get there, 1 for whale watching and 1 for returning to Puerto Madryn)
Watching the Whales
The whale-watching season runs from June-December. And to see whales, you will need to go during high tide. Check a tide forecast to see what time this is.
Whale-watching near Puerto Madryn takes place at Playa Las Canteras, not Playa El Doradillo as many online sources claim.
And you cannot got there independently unless you have a rental car. Uber would not work to reach the beach when we tried. Even if you do have more luck than we did (Uber does normally work in Puerto Madryn), you will need to pay the driver to stay whilst you watch the whales, otherwise you will have trouble getting back.
Now I DO NOT recommend taking a tour here unless you have a hefty budget. Tours are quite expensive and you can pay a quarter of the price by going with a local. Although the tours are on boats which may give you a slightly better view, if you can get close enough to the whales.
If you ask at your accommodation, you may be able to arrange a trip with a local. We were quoted £38/US$52 by our Airbnb host for a tour. In reality it was half this as the price was split between two of us.
If staying at a hotel, ask staff if they know anyone who can take you. Otherwise consider giving Couchsurfing a go to find a local friend who may be able to drive you there.
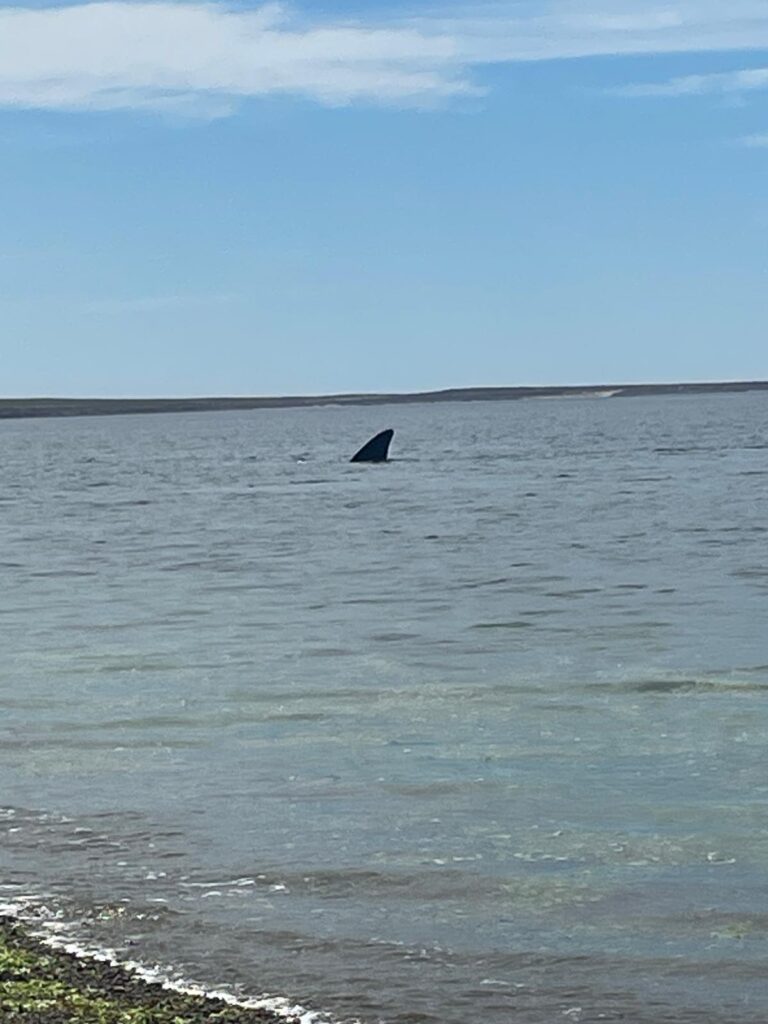
At the beach, the whales will swim just off the shore and you can often see them poking above the water. It’s a fun activity for an hour or so.
However this is just the warmup ahead of the main reason to come to Puerto Madryn…
Day 11: Punta Tombo/Isla Escondida Day Trip and Bus to Bariloche
Tour Cost: £86/US$117 + a £12/US$16 park entrance fee
Tour Hours: 8am-7pm
Activities on the Tour
Your tour bus will pick you up from your accommodation in Puerto Madryn or Trelaw, which is closer to Punta Tombo.
They will stop next to a giant dinosaur statue in Trelaw, but really the main event starts when you get to Punta Tombo.
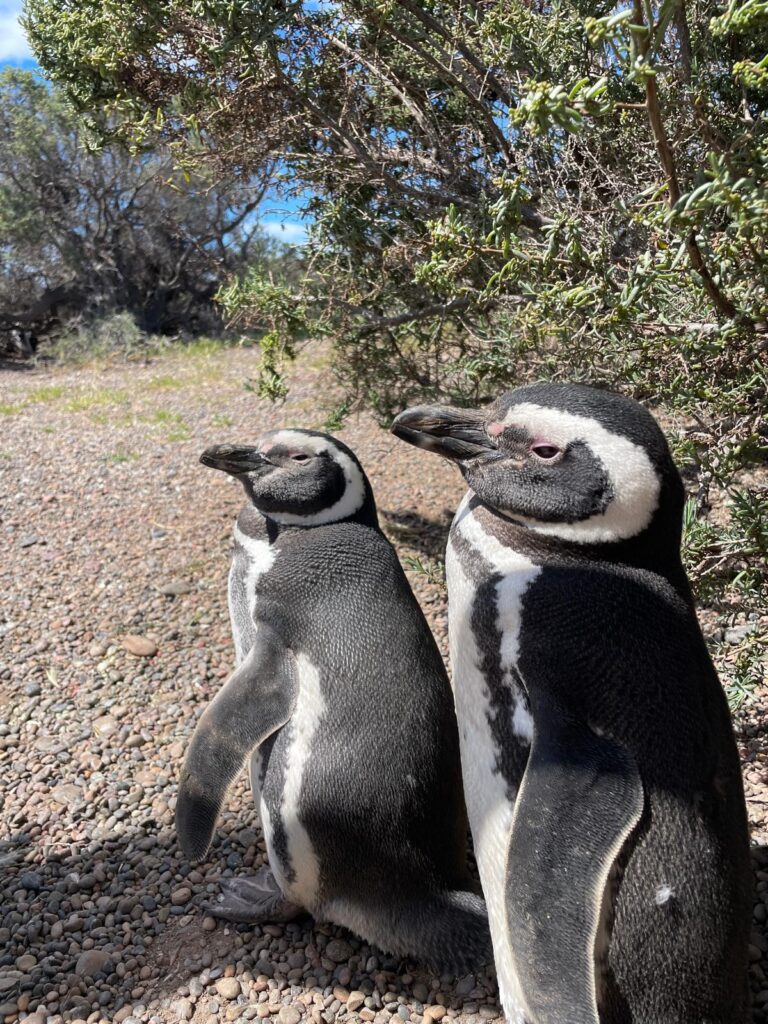
Punta Tombo
If you want to see penguins in Argentina, this is the place to come! There are thousands here, and you will see at least several hundred of them if you come during penguin season (September-March). We went in early October and they were there in large numbers.
You don’t have to walk with your tour group. They will give you 2-3 hours to roam freely as long as you meet back at the car park by 2:30pm.
We walked without the group and found it much better as we could walk at our own pace. And we got so close that we could easily touch the penguins if we wanted to!
Do not do this however. The penguins get stressed when touched, and they could peck you. Instead you can take photos with them.
My penguin selfie attempts were pretty awful in the end. Maybe you can get some good pics if you’re a more skilled photographer than I.
If like us you go in October, you can see the penguins building nests where they lay eggs. However the best month to visit Punta Tombo is November or December, which is when the penguin chicks hatch.
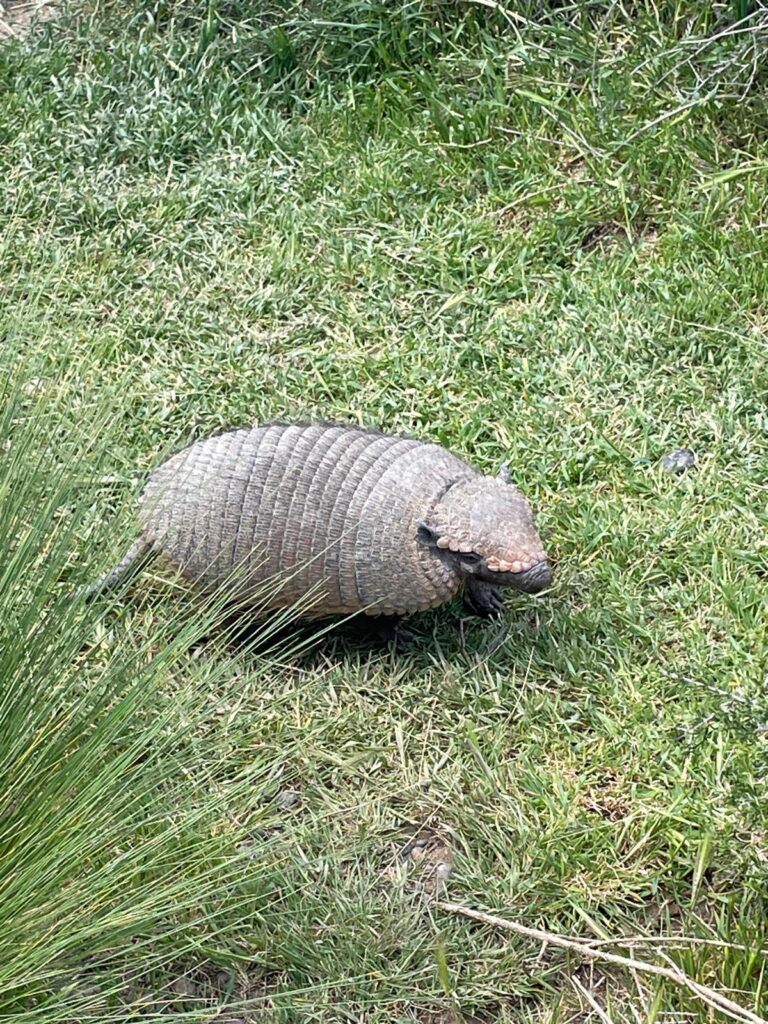
If you’re lucky, you can see other animals too. A series of guanacos were roaming in the background. But one of the highlights was encountering an armadillo which stopped in the middle of the walkway to drink from a small puddle.
Seriously cool stuff! Punta Tombo was a dream and I recommend visiting to anyone.
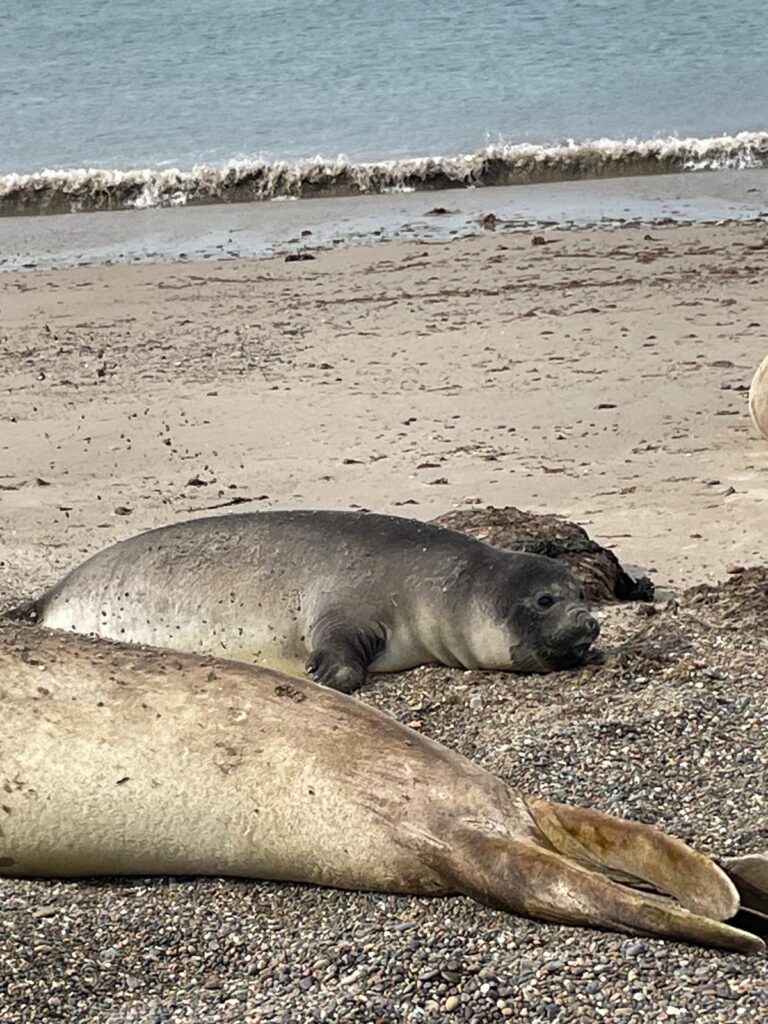
Isla Escondida
After meeting your group again at 2:30pm, you will head to Isla Escondida, which is where to find elephant seals from September-March.
And the seals are cool! They were mostly chilling on the beach, occasionally flicking sand and stones over their bodies to cool down in the sun.
The seals make constant noises, similar to someone who’s consumed too many baked beans…
They can be aggressive however. Our guide recommended staying at least 5 metres away, although a nearby sign said 30 metres.
The seals can attack each other without warning, or you if you get too close. These are big creatures which weigh over a ton, so you don’t want to mess with them. They’re also fast movers, which seems unlikely when you see how sluggish they initially appear on the sand. Don’t be fooled!
Either way though, the seals were seriously cool and a great bonus on top of the penguins, which was our main reason for visiting Puerto Madryn and Punta Tombo in the first place.
Buses to Bariloche
You can take a direct bus to Bariloche at 9pm with Mar y Valle from Puerto Madryn Bus Station.
Via Bariloche also has buses, but they leave at 6:15pm which will not allow you to get back from the tour in time.
Buses with Mar y Valle cost around £28/US$38 for a 15-hour journey. I say “around”, because the wildly fluctuating Argentine currency means the price in pesos will constantly change. There shouldn’t be too much difference in the £/US$ price however.
Day 12: Bariloche (Exploring the Chocolate Shops)
When you arrive, you will be exhausted, so I recommend a quiet afternoon. And there’s no better way to wind down than by visiting the many chocolate shops Bariloche is famous for!
There are several in town. But our favourites for what it’s worth are Fabrica de Chocolates and Rapa Nui. For some reason Fabrica de Chocolates is incorrectly located on Google Maps. The real location is here.
Rapa Nui is the most popular chocolate shop, and it’s also one of the cheapest. Fabrica de Chocolates on the other hand wasn’t quite as cheap, but would be my top pick for quality.
If you want my honest opinion, the biggest disappointments were Frantom Chocolates (expensive and not particularly tasty) and Catedral Chocolates (only really had nutty and alcohol-filled chocolates), although you may love the latter if nuts and alcohol are your thing.
Aside from chocolates, you will want to book tours for the coming days. If on a budget, I would recommend the Circuito Chico tour. At £18/US$25 it was pretty affordable, and we enjoyed it! However you can book it for cheaper at Hotel Edelweiss where it costs just £12/US$16.
We wish we’d known this before booking, but at least I can now share this tip with you to save a few pesos on the road!
Like other spots in Patagonia, Bariloche is one of the best cities in South America. It’s very enjoyable to spend time in.

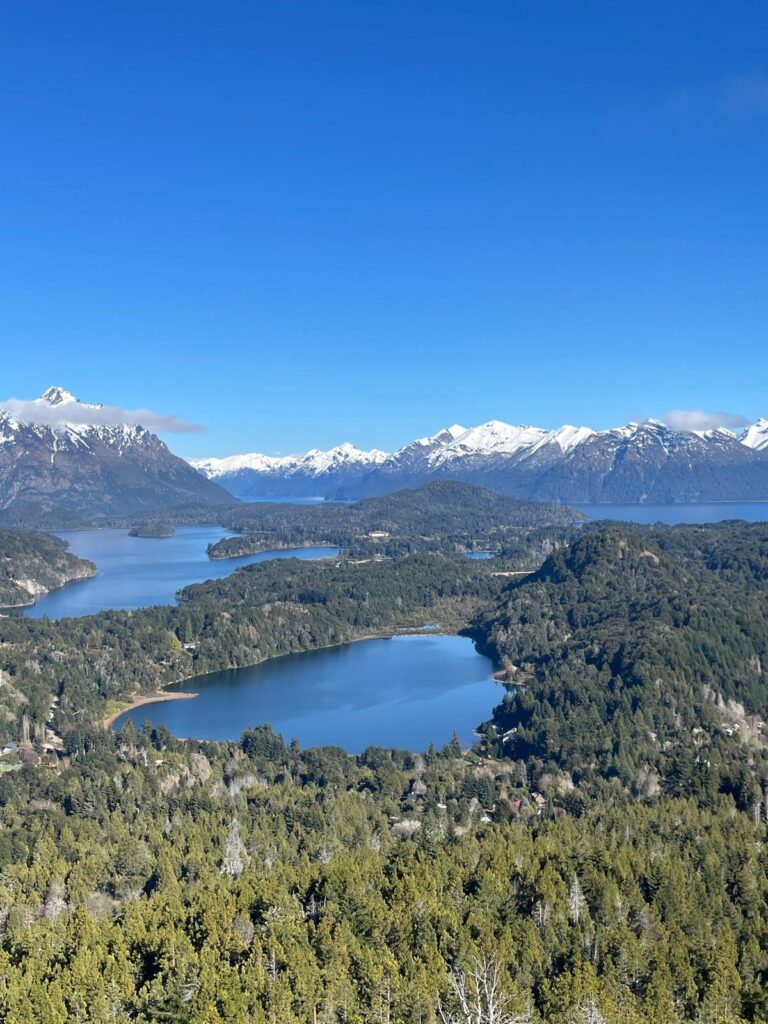
Day 13: Bariloche (Circuito Chico Tour)
Tour Cost: £18/US$25
Tour Hours: 8am-11:30am
Activities on the Tour
The tour starts by picking you up at one of two pick-up points in town: in the town centre itself, or at Hotel Edelweiss.
A minivan will take you to the first stop, Cerro Campanario. You have a choice: pay an additional £9/US$12 per person to take a chairlift to the top of the cerro (hill). Or wait for the group at the bottom.
Make sure you pay the extra to go up. Honestly, this is the main attraction of the tour. Without it, the tour may be a little underwhelming. But this alone makes it worth the money.
You have stunning views of the surrounding mountains and lakes from the top. It gives of a serious Alps vibe, so if you love Central Europe, then you’ll enjoy it here.
There’s also a bakery with great views of the surroundings. It’s a bit overpriced so we skipped it and brought our own snacks for the day.
Later on, the tour will take you to a couple of nice lake stops, which brought back memories of Lake Bled in Slovenia for me.
There was also a Romanian-style chapel on the tour, and a teahouse which admittedly wasn’t great. They gave a talk about tea in Spanish before giving us samples, which weren’t particularly pleasant.
Forget the tea though, the scenery is the whole point of this tour, and that alone made it worthwhile.
Day 14: Bariloche (Lago Nahuel Huapi and Heading Home)
On your final day, you will have a flight to catch. So take it easy and spend some time enjoying the incredible views for the last time.
Lago Nahuel Huapi is the lake you can see from the edge of Bariloche’s town centre. There’s a “Bariloche” sign with amazing mountain views in the background. It’s pretty popular though and you will most likely need to queue for pictures.
To be honest, you will hardly see yourselves in any picture with the sign. It’s better to just snap the scenery instead.
Lastly, head for dinner in the town centre and treat yourself to some final chocolates before taking an Uber to the airport, for roughly £7/US$9 and start your journey home.
If you have more time to explore the country outside of Patagonia, I recommend spending at least 3-weeks in Argentina which covers Mendoza, Cordoba, Villa General Belgrano (read here for things to do), Iguazu Falls, and Buenos Aires.
The capital alone has many awesome attractions including world-famous Cafe Tortoni, posh Palermo and Recoleta, upmarket nightlife spot Puerto Madero, cultural centre Plaza de Mayo and the famous colourful neighbourhood of La Boca with several fun activities.
What is the Weather Like in Patagonia?
Patagonia is known for being cold, and sure it certainly can be, but this is such a large region that temperatures vary based on location and time of year.
There are two rules of thumb that apply to the climate here.
One is that the western regions (near the Andes mountains) and the south (closer to Antarctica) will be colder than the eastern and northern parts of the area.
The other is that it can get very windy. VERY. I’m a fully grown adult male, well over 6ft tall, yet I struggled to stay on my feet whilst crossing the Chile/Argentina border.
Before visiting Patagonia I had images of snowy mountains and icy glaciers in mind. And yes, these are some of the region’s highlights, but in reality, the majority of it is just miles and miles of barren grassland.
This leaves the area exposed with little to break up the strong winds, meaning you will certainly feel heavy gusts. We experienced the worst of them at border crossings whilst taking the bus from Ushuaia to Rio Gallegos. But there’s also a lot of wind elsewhere.
That being said, it can at times get hot, in the northeast especially. In Puerto Madryn, only the sea breeze prevented it from being t-shirt weather.
It’s also worth noting that in South America, winter is from June-August and summer is December-February, the opposite of what Americans, Canadians and us Europeans are used to!
When is the Best Time to Visit Patagonia?
The best time to visit by far is the shoulder season from October-November and March-April.
This is because you can still enjoy everything the region is famous for, but prices are lower and you won’t have to worry about struggling to find accommodation, given the lack of high-season crowds.
The only exception would be to take an Antarctica tour. In that case you want to visit from November-March.
Safety in Patagonia
Patagonia is very safe to visit in terms of crime. Argentina is just about the safest Latin American country anyway, but even then, the dodgiest spots are the northern city of Rosario, and parts of Buenos Aires, both well away from Patagonia.
If you wish to learn more about possible dangers in this wonderful country, I have a detailed Argentina safety guide.
Chile is involved in conflict between the government and the Mapuche people located mostly in the Araucania region which is within Patagonia. However this doesn’t affect tourists, unless you go well away from the beaten path. Put simply, you won’t have any problems by sticking to tourist spots.
The real risks of Patagonia come from the cold weather, mountainous terrain and even a risk of avalanches.
Wrap up warm, prepare appropriately for safe winter mountain hikes and ask locals about avalanche risks.
I would also advise keeping your distance from some of the local wildlife. The elephant seals for example are heavy, strong and can be aggressive. Pumas meanwhile have a fearsome reputation, although in reality they are more likely to keep their distance from you unless they feel threatened.
First time visitors to South America will find this region to be a great spot to start their journey. I find it much calmer and more stress-free than crazy countries like Colombia, Brazil and Venezuela where you have to take crime into account.
How to Manage Money in Patagonia
Patagonia can sting your budget. You will need to be smart to make the most of your money here, especially given the complicated money situation in Argentina.
As mentioned earlier, you should NEVER use ATMs in Argentina. The fees and low withdrawal rates will destroy you.
Instead you should bring US$100 bills with you. Don’t bring bills worth under US$100, you will receive a much worse exchange rate.
Also, I recommend exchanging money before you get to Patagonia. If you stop in another part of Argentina such as Mendoza or Buenos Aires, it is better to swap money there.
If you don’t exchange cash, the next-best option is to use Western Union. Fortunately you can find branches all across the country, often tucked inside other stores, for example major supermarkets. Western Union often has the best conversion rates, but these can be cancelled out by high fees. That’s why I recommend cash as the primary option.
Otherwise, pay with your card. Most tour companies, bus companies and restaurants accept card payments.
Cards use the MEP exchange rate, which isn’t the best, but isn’t far behind either. With the inconvenience of exchanging so much cash, it can be best just to pay with card, even with slightly less favourable rates.
Only with accommodation have we often found ourselves in places that only accept cash. Some will take US dollars, but not necessarily for good rates.
A Full Breakdown of Our Spending in Patagonia
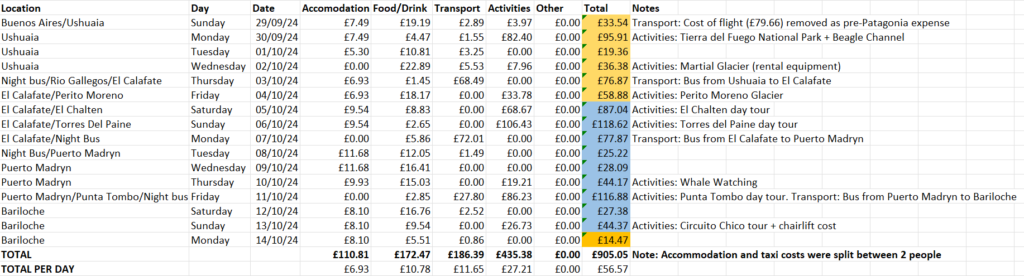
If you want a full breakdown of how much we spent in Patagonia, I’ve compiled a spreadsheet of our daily spending broken down into different categories, and shared a screenshot below. The figures used are for my own expenses, although my girlfriend’s were fairly similar as we did the same things. But to summarise:
I spent £905.05 (US$1,131.31) in total, working out at £56.57 (US$70.71) per day. This does not include flights to and from Patagonia, which will vary wildly depending on where you are flying to and from.
My total accommodation expenses were £110.81 (US$138.51), or £6.93 (US$8.66) per day. Travelling with my girlfriend meant we shared the accommodation costs 50/50. For solo travellers, your costs won’t necessarily be double this as you may be able to find hostel beds for slightly less than twice the price.
I spent £172.47 (US$215.59) on food and drink, or £10.78 (US$13.48) per day. This includes all meals and snacks from the supermarket. It does not include beers which I have listed under “activities” instead.
My transport expenses were £186.39 (US$232.99), or £11.65 (US$14.56) per day. Taxis are pretty cheap in Argentinian Patagonia, although taxi costs here were shared 50/50 meaning the real price is double what is listed. Any cheap expense under “transport” was one or multiple taxi rides. We did not use transport in Chilean Patagonia as we went with a tour. Almost all of our transport expenses were on long-distance buses from Ushuaia to El Calafate, El Calafate to Puerto Madryn, and finally from Puerto Madryn to Bariloche.
My total spending on activities was £435.38 (US$544.23), or £27.21 (US$34.01) per day. The biggest cost by far accounting for almost half our total spending. Most activities we did were tours with local companies, booked in Patagonia whilst we were there.
I spent nothing on anything which doesn’t fit into these categories. I already had a SIM card from Buenos Aires, already had all the clothing I needed, and didn’t buy any equipment, aside from renting spikes and a stick for the Martial Glacier hike (accounted for under “activities” instead).
What to Pack for Your Patagonia Trip
Patagonia is cold (mostly), which means you need your cold-weather clothes including a wooly hat, scarf and gloves. Sure, you can buy winter clothing in some places such as Ushuaia and Bariloche, but it’s going to cost you more. Bring it with you if possible.
Patagonia uses type I (Argentina), L (Chile) and C (Argentina and Chile) plug sockets. Therefore you should bring an adapter that works with all 3. In practice, I’ve seen very few type C sockets in Argentina, so expect to use type I sockets predominantly.
I recommend the JYDMIX universal power adapter. This is not an affiliate link, I receive nothing if you purchase one through there. However my own JYDMIX adapter has worked in 80+ countries without issues since January 2019 and is still working without any issues whatsoever today.
Whilst almost all of my travel equipment has broken over the years, my adapter seems to be made of the same material as an old-school Nokia brick phone as it has withstood a fair few batterings. Bring one of these for Patagonia and you won’t have connectivity issues.
You will also need portable phone chargers to replenish your battery during lengthy bus rides.
And don’t forget a good medical kit. I always carry a first aid kit when I travel. It has to be small enough to fit inside your bag, and can come in handy should you slip on ice or fall over in the mountains.
Lastly, I always bring my trusty Water-to-Go filtered bottle with me. This has a filter which allows you to drink untreated water safely. It allowed me to even drink tap water in India without issues. To be honest tap water in Patagonia is mostly drinkable anyway, but having this removes any element of doubt.
Travelling in Patagonia With a Disability
It can be a struggle to travel with a disability. Fortunately, Argentina and Chile are two of the most accommodating countries in Latin America.
Let’s start with some good news. National parks and other public attractions often have free entry for anyone able to show proof of a disability.
Tierra del Fuego National Park, Ushuaia’s Prison Museum, Los Glaciares National Park (where Perito Moreno Glacier is based), Torres del Paine National Park and Punta Tombo all have entry fees ranging from £12/US$16 to £32/US$44.
If you have a card, certificate, or screenshot of an official document confirming disability, entry to all of the above is FREE saving around £100/US$135 in entry fees. Please note that there are no discounts on tours, only entry fees.
Elsewhere, the terrain can be tricky in Patagonia for anyone with mobility issues. It’s mountainous, rocky, snowy and windy, sometimes all at the same time. I would recommend dropping Martial Glacier, El Chalten and the Circuito Chico tour in Bariloche from this itinerary if you use a wheelchair or have major issues with movement.
Despite that, the Circuito Chico tour may still be doable if you are able to sit on a fast-moving chairlift without problems.
The El Chalten tour involves hiking up a short mountain trail of intermediate difficulty. It is not accessible at all. A later 10-minute waterfall walk may be doable with difficulty, but isn’t worth doing the tour for alone.
Torres del Paine is mostly doable, although there is a 45-minute round trip walking to a lake which is not wheelchair-friendly and can be difficult for anyone who struggles to walk at a regular pace.
The Perito Moreno Glacier is especially great for people with disabilities. There is an accessible trail which makes it possible for anyone to visit with ease. Punta Tombo is another easy and accessible attraction.
Lastly, I would recommend flying between destinations rather than taking the long-distance buses that we did. This is because the buses can be very uncomfortable and drivers will rarely make accommodations for disabled travellers. At airports you are far more likely to receive the support you may need.
What Food Can You Find in Patagonia?
In Patagonia, you can of course find Argentinian and Chilean food. Naturally, this includes delicious asado. However, you have a much smaller choice of restaurants, and asado is pricy down here, which means you should consider some of the local delicacies instead.
Patagonian lamb is a particular favourite in the region, and it tastes pretty good! I sampled some of my girlfriend’s in Ushuaia and it was much better than the pretty bland pechuga de pollo on my plate. The locals recommend this for good reason.
Head all the way down to Tierra del Fuego, the island on which Ushuaia is based, and you can find a lot of seafood. The beastly centolla (king crab) is the dish of choice for Patagonian residents. This intimidating-looking creature is another local favourite.
Lastly, you can even eat guanacos in some parts of the region, most notably El Calafate. Our guide for the Torres del Paine tour said their breeding is out of control, and the explosion in the guanaco population is causing major problems in the local ecosystem.
To combat this, locals will eat guanacos, and you can too! Although I tried alpaca in Peru and it was enough to dissuade me from trying this…
What Wildlife Can You Spot in Patagonia?
Patagonia is roughly twice the size of France. So this is a big region of the world, which also means it’s home to a wide range of creatures roaming along the plains, mountains, beaches, waters and everywhere else that makes up this area.
One of the most common creature is the guanaco, which looks similar to a llama or alpaca. You will most likely spot these at least a couple of times during your trip.
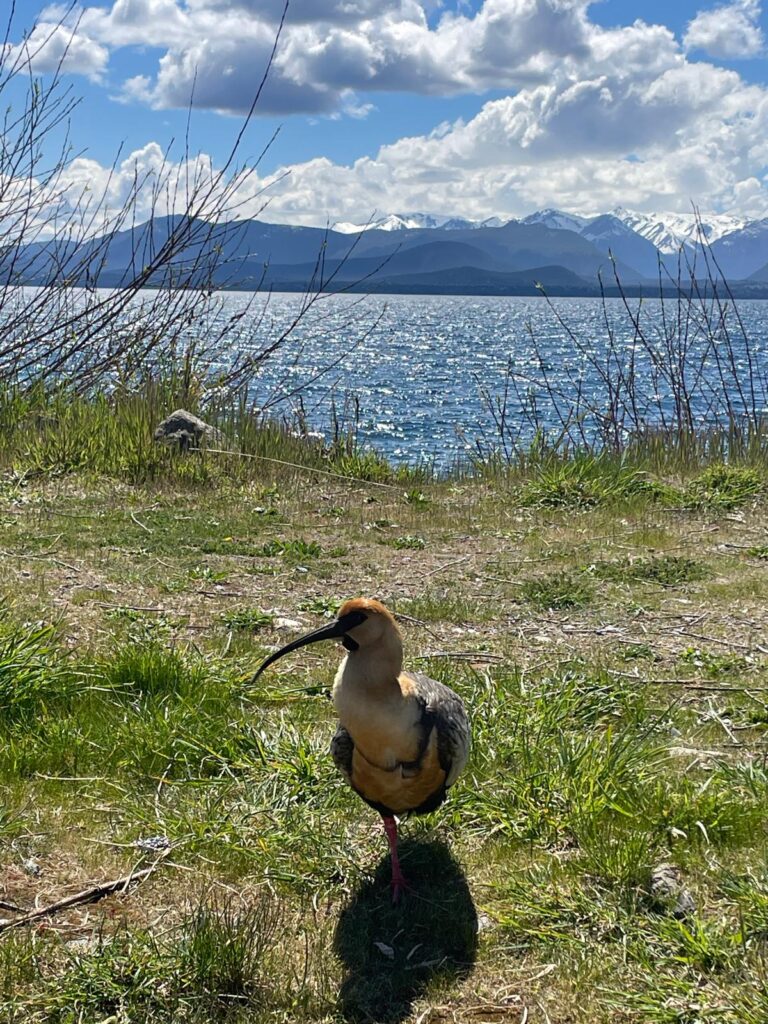
Andean condors are vultures that feed off the bodies of dead mammals. Lovely stuff, right? Well you can spot them in the Andes, most notably at Mirador de Condores where they fly overhead. You’ll need binoculars for a good view however. You can’t tell what these creatures are just by using your bare eyes.
For marine life, Peninsula Valdes just north of Puerto Madryn is the place to be. Orcas and sealions are found here, as well as some of the creatures mentioned earlier in this itinerary, although the best spot to see elephant seals is still Isla Escondida, and for magellanic penguins it is Punta Tombo.
There are other rarer creatures to be found. You are said to be very lucky if you encounter a puma due to their rarity. One passed our vehicle in Torres del Paine, although only the guide and driver saw it, so we were unfortunate in that regard.
There’s a lot more to Patagonia than these. The ostrich-like rhea, a large rodent called a mara and the world’s smallest deer, a pudu, can also be found in the region.
The Galapagos Islands and Amazon Rainforest are famous for being South America’s wildlife hotspots. But this part of the world also has its fair share of cool creatures.
Which Other Places in Patagonia are Worth Visiting?
Our itinerary was mostly centered around Argentinian Patagonia. And we have no regrets, but there are still other places worth going to if you have a longer trip.
Punta Arenas in southern Chile offers similar experiences to Ushuaia with the Cerro de la Cruz viewpoint overlooking the Magellan Strait, penguins on nearby Isla Magdalena, and cruises running to Antarctica. It’s also where you go to see Chile’s fjords.
When I did a tour of Chile’s capital Santiago, I asked the guide about the best parts of Patagonia to see. One of his recommendations was Coyhaique.
Coyhaique is a lesser-visited part of the region, with access to the Cerro Castillo National Park (a popular location with hikers). It’s connected to other parts of Chile by the Carretera Austral, a long road that makes it much easier to reach other parts of Patagonia.
Now one place that looks really cool is the marble caves near Puerto Rio Tranquilo. They’re a unique place that you won’t find an equivalent to in Argentina.
And lastly, there’s also Puerto Natales. Some people use it as a gateway to Torres del Paine. But it’s also another place from where you can see Chile’s fjords.
Is 2 Weeks Enough Time in Patagonia?
This 2-week itinerary is enough to see the very best of the region and get a taste of everything from glaciers, to penguins, to amazing mountain landscapes. However it is not enough to see everything that Patagonia has worth seeing.
This is NOT a budget-friendly region, which may make it tricky to travel here for longer adventures unless you have deep pockets. However, I would say you need a minimum of 3 months in the region to see everything of interest.
Even then, you will be racing around with little time to relax. Therefore I would say 6 months is the minimum amount of time required to see every interesting corner of Patagonia, whilst allowing time to slow down and rest in what can be an exhausting (yet exhilarating) part of the world to explore.
Patagonia puts Argentina right at the top of my South American country rankings.
Argentinian or Chilean Patagonia: Which is Better?
Both sides have their pros and cons at the end of the day. The landscapes are mostly pretty similar, likewise the wildlife.
However Argentina is cheaper than Chile, making it by far the better option for your budget, although the gap has certainly closed with Argentina’s currency crisis making the country more expensive for visitors.
Argentina also has more of a well-trodden tourist trail, whereas Chile isn’t quite as popular at this point. Perhaps partially due to the fact Argentinian Patagonia makes up 90% of the region, whilst Chile only has 10% of its land.
To be honest, this question is pretty subjective, and at the end of the day you would have to spend a significant amount of time on both sides to come to your own conclusion here.
I would recommend seeing as much as you can, and perhaps squeezing in a bit more of Chilean Patagonia if you end up with more time than the 2 weeks this itinerary covers. Budget-dependent of course.
Either way however, Patagonia is a magical part of the world and should be a must on any South America itinerary.
More Posts on Argentina
- The Best Things To Do In Buenos Aires: A 3-Day Itinerary
- Buenos Aires Vs Rio De Janeiro: Which Is Better To Visit?
- Planning The Perfect Day Trip To Colonia From Buenos Aires
- Is Argentina Safe For Tourists To Travel To? South America’s Best Beginner Spot
- Salta To Asuncion By Bus (Clorinda/Jose Falcon Border)
- How To Get From Salta To Uyuni By Bus (La Quiaca/Villazon)
- Where To See Penguins In Argentina On A Budget: Punta Tombo
- One Day In Buenos Aires: The Perfect 24-Hour Itinerary
- A 2 Week Patagonia Itinerary: From Ushuaia To Bariloche
- Best Things To Do In Ushuaia: Don’t Miss Out On This Gem!
- Cafe Tortoni: What To Expect In The Famous Buenos Aires Cafe
- Iguazu Falls Border Crossing: How To Cross The Triple Frontier Between Argentina, Brazil And Paraguay
- The Ultimate Guide To Visiting Iguazu Falls (Argentina Side)
- Money In Argentina: How To Get The Best Rates
- A 3-Week Argentina Itinerary: From Mendoza To Buenos Aires
- What To Do In Villa General Belgrano?
- How To Order Steak In Argentina
- Top 5 Things To Do In La Boca, Buenos Aires